Nova Scotia Retiree by Ben Weeks, Whites Lake, NS, Canada
Posted on February 05 2014

By Ben Weeks
Several Years ago after I had the delightful and almost Zen like experience of building both one of Ted's canoes and a kayak, I gave the following presentation to a group of Probus (retired Rotarians) in Halifax.
The Life of a Stripper
Little did I know that just two months after I foolishly offered myself as a standby meeting topic, I would be called to duty to fill a void. I am what you might call a second stringer (Pardon the pun)
When I went to naval college I learnt a valuable lesson. never volunteer for an unknown task. In my dotage I had forgotten that rule. I have a hobby that I very much enjoy, but I am concerned that it will not be of general interest. As Andre had managed so well with his hanging gazebo project, I thought I would give it a shot. At least this topic should interest the engineers and boaters.
What is a stripper? Besides the obvious professional stag attendee, a stripper is someone who builds boats out of woooden strips which have been bead and coved. To the uninitiated that is tongue and grooved. I have a friend who is a maker of rugs. She calls herself a hooker. So together we are lightheartedly called a couple of hookers and strippers.
Now lets get into the art of stripping. Where shall I start? As all good engineers will tell you, you need:
Budget about $1500.
* A plan - This includes a budget, bill of materials and list of required tools
* A space – Canoes and kayaks are long narrow objects so you will need a room about 24 x 10 feet and an exit strategy. I am lucky. I have a large unfinished basement with a sliding door.
* An accommodating spouse – You will disappear for hours on end, and you will bring sawdust and smells into the house. But at least your spouse knows where you are. My estimate is 250 hours for one canoe. If you were planning to do this for a living, you may be able to sell a unit for about $4000. After deducting the cost of materials that works out at less the $10 hour for your labour. Keep it as a hobby.
* Ability to scrounge. – As you will see, one of the most important tools is a C – clamp, and you can never have enough. The minimum is 16. I now have 20. I recommend yard sales or your son-in-law’s workshop.
Why do I enjoy stripping? Because I am building an object that is intrinsically beautiful, but also totally utilitarian and functional. You can’t say that of some beautiful women. When you are building a wooden canoe or kayak you are following in the wake of Canada’s first people. There is great genius in the usefulness and simplicity of these craft that are very much part of our heritage. I love the outdoors and live on the water. What could be more natural then to combine that love with something as beautiful as a cedar strip canoe?
First Steps
Go to the expert. I went to the guru of Canadian cedar strippers – Ted Moores. His books Canoecraft and Kayakcraft are marvellous "how to books" and are regarded to be the bibles of cedar stripping. When Canada wanted to give a wedding present to Charles and Diana, the government commisssioned Ted Moores to build a canoe. I don’t think there is an object that more represents Canada and is also beautiful then a cedar strip canoe. I wonder where that canoe is now. Have William and Harry paddled it or is it gathering dust somewhere?
Choose a design that best fits your planned use. River or Sea, day paddling or camping trips, expert or novice? Pin up photos and plans in your workroom for inspiration and get started.
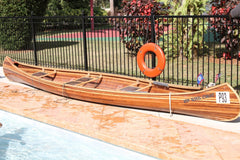
My first canoe was a 16 foot Prospector. Appropriate as I live on Prospect Bay. It is also one of Moore’s most enduring models and easy to paddle.
Order of construction:
1. Build a strongback – Prime requirement, when finished it must be level in all directions. On this base you will build your canoe. If not level your canoe may come out with a twist. It can be used for as many canoes you plan to build, and afterwards can even be a long work bench or picnic table.
2. Build molds. These will be placed every foot on the strongback and will provide the form around which you will fasten the planks. Prime requirement is accuracy. Each mold must be cut to within 16th of an inch tolerance. The key is an accurate transfer from the plans to plywood. A good jig saw is very useful.
3. Build stems. – Made from hardwood laminate (Ash). First steamed using a PVC pipe, your spouse’s old kettle and an old sweatshirt as a stopper.
4. Set planking - Staple or stapleless? Like me you will probably start with staples but with you second boat I am sure you will want to go stapleless. When you remove the staples your are left with a pattern of little holes every foot. Not displeasing but less challenging.
Choice of different toned cedar strips will result in a pleasing pattern. The artistry is up to you! The best tool for this stage is a Japanese saw. This is a marvellous weapon and very ergonomic.Unlike the western saw it cuts on the pull stroke and not the push, and is therefore much more controllable.
The final strips have to be measured and cut with care
5. Place ouside stems and remove all those staples! Look and admire!
6. Sand , fill voids with tinted epoxy and sand, sand, and the sand some more. A random orbital sander is a must unless you are exceptionally fit. Even then you will still do a lot of hand sanding
7. Fibreglass and epoxy. You need a willing helper. My son- in - law was pretty good. Epoxy has to be carefully mixed with a catalyst and you have about 20 minutes to work with each batch. At least three coats of epoxy. Choose a day when you can open all the workroom windows. Try to have your spouse out of the house and visiting the grandkids during this time.
8. Cut surplus cloth, and sand , sand...........For the first timer this will be very disconcerting as the beautiful wood will totally disappear!
9. Remove canoe from the molds, prepare a canoe cradle, turn the boat over and admire!
10. Fibreglass and epoxy the inside of canoe – at least three coats. The hard part is getting the cloth and epoxy into the sharp tapered ends.
11. Cut surplus cloth and sand and sand......
12. Install trim – Inwales, outwales, deck, and thwarts – very rewarding as the finished boat takes shape.
13. Varnish – At least 6 coats, sanding and sanding between each coat. If the weather is dry and calm try to do this stage outdoors, but make sure it is before the black fly season! Varnish make a wonderful fly catcher. Your spouse will appreciate it. Stand back and admire!
14. Enjoy your finished boat. Because it is so beautiful you may be reluctant to put it in the water. Fear not, you have built a canoe that is actually stronger then the typical plastic one, and scratches can easily be sanded out!
As the Visa commercial goes cost of materials and tools about $1500, enjoyment and satisfaction- priceless
Building a Kayak
My second cedar strip was a sea going kayak.. My choice was the popular Endeavour 17. Reasonably stable and can be used on the ocean for day trips or camping journeys.
Technique is really the same as for a canoe. The only difference is that you have an enclosed deck with a cockpit and hatches and less room to work.
You will be able to use the same strongback!
The mold is cut for both the hull and the deck.
Your second boat, go stapleless! You will need many jigs and wedges.
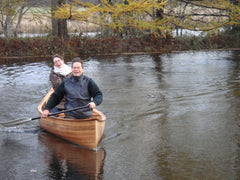
Angela my daughter commisioned me to build a kayak after seeing my first attempt at the canoe. She paid for the materials and I donated my labour.
After the kayak was finished except for varnishing I fitted the seat and foot braces, just like a tailor fits a suit. Grand daughter Claire was one month old and was part of the fitting ceremony.
After six coats of varnish, and lots of sanding between each one, you have a finished product to admire and the finished product is ready to go.
The first calm day in spring the kayak is launched and tested. No leaks!
Tale of caution. It is recommended to kayak at least in pairs. So you can’t just build one!
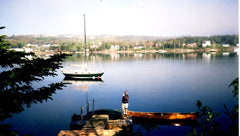
Since building the canoe and kayak I have paddled for many hours on Prospect Bay just south of Halifax, but my greatest joy has been in paddling in Kejimakijik park with my daughter, son-in-law and two grand daughters. Keji park is a beautiful series of lakes but the shoreline is all rock and the portages challenging. Ted's crafts have come through with only scratches and they are easily fixable!
I hope you can make use of some of this story!