A Gift from My Sons
Posted on February 15 2014

For Christmas, that year, my sons gave me the plans for a Rob Roy Solo canoe and a gift certificate for supplies. I lost my job in April 2010. So I was job seeking. The canoe project was a great distraction and I did my obligatory job search each morning.
Building a canoe was such a surprise and I wasn't prepared to tackle the task. I had been saving gift money to buy a canoe. My sons, I presume, thought I was procrastinating. They took matters to another level. The look on my face was probably priceless.
My son, Eric, was going on an extended business trip and he offered his basement to me for building the canoe. That winter was also quite cold. The basement was at 40°-45° most of the time.
I studied the plans. Watched several Youtube videos and bought the Canoecraft book. The book was invaluable in guiding me through the building processes. I also had two other books that offered alternative solutions.
Gathering all the tools and assembling the strongback took about a week. I ordered the red cedar bundle for the Rob Roy canoe. When it arrived I sorted the individual bundles and labeled them. The plan was to construct a 'married' strip hull with the darker strips placed at the waterline.
Clamping and the extended drying time @ 40° was slower than expected. Only 3 strips per side were placed each day. During the drying periods, I carved an ash yoke, made a laminated paddle, and built a steamer to bend stem laminate.
The first steamer was an electric coffee pot and a length of 2" PVC pipe. The coffee pot didn't work well and I soon found an electric tea pot that worked. I cut 1/4" slips of cedar and spruce for the laminates. The first cedar strips failed. Maybe, I cooked them too long and they looked like pulp. I made another set that remained solid.
I don't remember where some of the wood for the laminated paddle came from but after I finished the rough sanding I felt ill. The finish on the wood may have created some noxious fumes. I was ten miles from my home and I was a little dizzy. Foolishly, I drove home. I wasn't thinking clearly and it could have ended differently.
Still placing strips on the strongback, plans for the laminated decks and the gunwales were in progress. Rough cut boards of ash were for the inner and outer gunwales. The boards were 2 inches thick and 10 feet long. The canoe is 13 feet long. I made 12" scarfs to join the two sections of each gunwale.
All the strips were now placed, hundreds of staples pulled, and the voids were filled. The surface of the hull was horrible looking. I couldn't wait to clean it off. It was time to sand.
The immediate working area was draped with plastic drop cloths to minimize the airborne dust. The gas furnace was of some concern. It was important to keep the potentially combustible sawdust away from the igniter.
When the outer hull surface was sanded smooth and I wanted to remove the hull from the form. This would be the first time I saw the inner surface of the hull. You really have to like sanding when woodworking.
The hull was placed back on the form. I thought I would sand through the thin cedar many times. I fitted and secured the stems, temporarily fit the gunwales and decks. Then the gunwales and decks were removed.
I started with a seal coat of resin on the outer hull. Laying the glass on the outer hull was easier than I thought. Applying resin was more difficult. Watching the initial application of resin over the white colored cloth was startling and beautiful. The shining fiberglass made the canoe look amazing.
The resin had set the fiberglass and it was time to remove the hull from the form again. Cradles were made to support the canoe right side up and I finished sanding the inner surfaces.
By May 2011 the weather had improved. I took the canoe outside to continue sanding. Neighbors were stopping by to look at the canoe. Some would ask if I was planning to put it in the water. One neighbor suggested that it belonged in a museum. I was flattered.
Sanding, sanding, and more sanding. The outer fiberglass was smooth and in the inner cedar surface was ready for the fiberglass. I found the inner fiberglassing challenging. The glass moved and the resin was setting too fast. More sanding to look forward to.
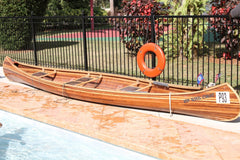
Satisfied with all my sanding, preparation for varnishing the hull began. I used Last-n-Last varnish. The hull, decks, and gunwales were varnished separately. Three to five coats of varnish was applied.
The varnish work was finished and the gunwales and decks were fitted again. The gunwales fit well and were attached with brass screws. The scarf joints didn't hold, as planned, with the Titebond III glue I used to build the canoe. After failing with glue, I visited the local hardware store and they recommended PL400 flooring adhesive. The joints haven't failed since.
The yoke and seat were installed. Brass oval washers were hand made from an old brass light switch cover. There was a sufficient amount of cedar strips left over. I asked my sons if they wanted a model canoe. Each one said "Yes". I brought the original plans to a blueprint shop and had them reduced to 1/3 scale.
The original model was constructed at my son's house during the canoe build. I used the same principles to build the model as the original canoe. The reduced size strong back needed tweaking and the cedar strips were halved to facilitate bends at the tighter curves. I made a few model canoes that summer.
Another thing learned from this project was not to use staples again. I prefer 3/4" brad nails. I would use a 1/8" spacer between the head of the brad gun and the hull surface. That allowed me to remove the brads easily. The brads and mini clamps secured the cedar strips well.
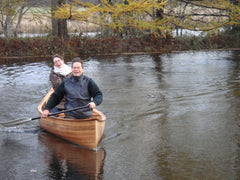
Sadly, I have not used the canoe. This year it will go in the water.