Builder Stories: Steve Shergold's Ranger 15 with Wannigan

Photos of Steve Shergold's Ranger 15 attracted a lot of attention when we shared them on social media. The canoe itself looked great, but a lot praise was due to his clever additions, like a custom dog basket and wannigan that folds into a picnic table. We asked Steve if he might share the story of how he approached his build, and he generously replied with this detailed account.
Thank you, Ted and all the Bear Mountain followers for the positive comments on my first attempt at building a cedar strip canoe. Here is a bit more information and some of the construction pictures. I don’t think the internet needs anymore Canoe Building 101 pictures, so these are just some of the highlights and a bit more colour on my personal journey.
I’ve done a lot of woodwork, but only at a hobbyist level; I have a good eye for detail and I’m good at covering up my mistakes! My workshop, which is just a large single garage, isn’t exceptional, though I do have a good range of machinery and a lot of clamps! I’ve done very little glass fibre work before, haven’t weaved anything since making raffia matts in junior school, and have never steam-bent anything. I do have a very patient wife and a dog that doesn’t need walking every day.
I’d been thinking about building a boat for a long time and had considered rowing boats, sailing dinghies, skin-on-frame construction, the whole lot. In the end it was my wife who pushed me into it, effectively saying ‘stop messing about and get on with it’ and ‘If you’re going to spend that much time and effort on it, make sure it’s something I would want to be seen in!’ So I started on 1 Aug 2020 and finished exactly 9 months and 600 hours of input later ( That doesn’t include all the time spent pondering the details and just looking at it).
The Boat
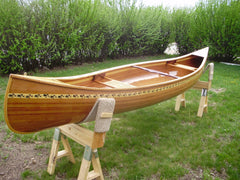
It’s a standard Ranger 15, with only a slight modification to the ends; I cut them a little lower so that the boat would fit within the restricted space I have for storage and besides, I liked the look of it.

The only part of the job that I didn’t do for myself was milling the cedar strips. I bought these from Barry Biddlecombe at the Cedar Strip Co in Essex, UK and I bought enough for a 16 footer so had spare material left over for the wanigan. The main build was quite straightforward with the addition of a feature strip to mark out the ‘football’ in the bottom. I made this out of 1/4” strips of mahogany and construction timber, glued together on top of a long 2x2 covered in packing tape. I trimmed the adjacent cedar strips to get butt joints and it worked pretty well . Obviously it helps to have a halfway decent table saw for this sort of thing and it wasn’t the only time I was thankful for the x30 clamps I bought for the project.


Incidentally, both the internal and external gunwales are only stuck on with epoxy, with no through fastenings. I figured that if epoxy can hold aeroplanes together it was good enough for me, though I did add a fillet under the inner gunwale.
The decks are made of sapele, with the strips made of ironwood (I ran out of mahogany) and pine. Obviously this is to match the feature strip in the bottom of the boat, which required a bit of care with the angles . The curved upstand for the decks is sycamore, the same wood that I used for the seats, yoke and dog basket. I tried steam bending a solid piece for this curve but it didn’t work (several times) and I settled on three thin strips; very similar to the construction of the stems.


At one point in this whole process I came to the conclusion that you don’t build these canoes, you sand them into existence! After a while I thought I hated sanding, however I now reserve that emotion for varnishing! After 6 coats of two-pack Epifanes it still isn’t perfect, but I’ve realised that there is more to life than chasing defects and anyway I can always make sure they don’t get into the photos.
The Wannigan
I don’t know when I decided that I absolutely had to have a Wannigan at the same time as a new canoe, but after a while it was just accepted as part of the project and made a break from sanding! That said the construction is just like a boat, so unsurprisingly there’s a lot of sanding involved!
The shape is based around the #3 station mould with some minor adjustments for the thickness of the cedar and glass and much messing about with cardboard profiles to ensure the box maximised the available volume but could still be lifted in and out without catching on the inner gunwales.
Once the mould was built, laying up the cedar was simple and I stapled all the planks in place, knowing I would cover up the holes later. I was careful with the planking to make sure it matched the boat including the feature strips. The two sides were laid up on a board with a frame over the top at the last minute so that I could use wedges to hold everything tight and flat.


Once it was all glassed and epoxied using off-cuts from the main build, I steam-bent and then glued thin, wide sycamore strips around the edges of the main body piece which created a ledge to sit the sides against. Once fixed, I also had a cutting template for the sides, so that when they were epoxied in place with a small fillet running all the way around the inside, there were no serious gaps.


The top is exterior plywood. If I’d had some, I might have used marine ply, but considering all the varnish it’s had and the limited exposure it’s going to get, I didn’t think it necessary. Besides I liked the light finish on this plywood. The strips at the top are shaped to reflect the boat’s external gunwales. They give extra hand holds when getting the wanigan in and out of the canoe and they give a nicer finish to the top edge of the side. The handles in sycamore were simple, but needed a lot of fiddling and checking to ensure they looked right and did not catch on the inner gunwales. The opening has an upstand to make it more water tight and there is a strip of compressible foam to complete the job. So now I think it serves both as a picnic box and a buoyancy chamber, provided of course that it’s tied into the boat.


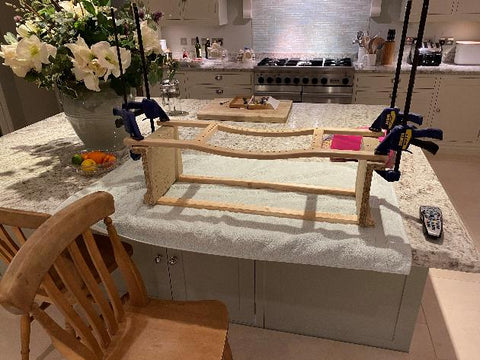
The lid can be taken off and turned into a picnic table. The stand collapses small enough to be put in the Wannigan without taking up too much space. The hinges started life as standard brass lift off models; I just ground them down to make a slightly more attractive butterfly shape. The catches on the other side to the hinges put a bit of pressure on the lid to hold it tight shut and they can be padlocked if needed. That said, if I ever felt the need to padlock the lid to protect the champagne, I’d probably need a big ugly bike chain to protect the wanigan and a guard to protect the canoe!


The last bit of detail is the feet! With just a rounded bottom the wanigan rocks about a lot. Not a real problem in the boat where it matches the hull shape, but a nuisance on dry land. So the underside has two strips of wood added over the top of the pine in the feature strips. They don’t lift the whole thing off the floor, which would have created problems with the fit into the boat but they do make it rock solid for loading / unloading when ashore.