Adventures in Composite Canoe Building, Part 1: Heckle

Randy Pfeifer maintains the Bear Mountain Boats Builders' Forum and is highly knowledgeable on the subject of woodstrip epoxy canoes. In this series, he documents his experiments building multiple canoes using composite materials, with the goal of creating a lightweight but fully functional Freedom 17.
by Randy Pfeifer
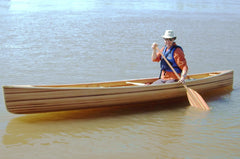
After building a few Bear Mountain Boat designs (Redbird, Freedom 15, Freedom Solo) I decided to build a tripping canoe for trips into the BWCAW and Quetico. I chose the Freedom 17 based on excellent reviews from other builders. It is indeed a wonderful craft. Following the plans drawn by Steve Killing for Bear Mountain Boats was easy (as expected). I got the hull stripped and glassed easily. Just as I finished glassing and sanding the outside and cutting the sheerline, I had a thought about attempting to use that newly built and sanded hull as a mold to build a composite canoe with the same shape. Surely it would be light as a feather (I’m not getting any younger and weight has become an increasingly important topic over the years). I did some quick searching on the interwebs and was given general and fairly consistent advice that “it’s not a good idea” and that the “right way to do it” would be to use the strip hull as a plug to build a female mold from the cedar strip hull and use that to build composite hulls. But I really only wanted one composite hull and it seemed like a lot of extra steps to produce a female mold that I would have to dispose of somehow later. Using my existing wood hull as a male mold and then adding trim to it, finishing its build after the composite adventure, just made more sense to me. Nothing to dispose of later and I would end up with two canoes instead of one. And I might just learn something in the process.

So, despite the feedback from the experts (and to be honest, somewhat because of that feedback) I decided to forge ahead with my crazy idea. And to demonstrate that it wasn’t a fluke, I decided to make two composite canoes while I was at it. They would be named Heckle and Jeckle after the two cartoon characters from my childhood (thinking back, they kind of remind me of my two sons Patrick and Thomas – Patrick was the drive behind starting the Redbird project and Thomas was instrumental in building the Freedom 15).
I did some research on various lay-ups used in commercial canoes and some looking at various core materials I might use. I decided on starting with a layer of Kevlar followed by a layer of Carbon Fiber and finally a layer S-glass on the outside. But before I cracked open any epoxy cans, I needed to find a way to make certain that the new hull would release from the wood/glass hull I had worked so hard to build. There are release agents available that I have no experience with but I was reluctant to brush that stuff on top of my wood/glass hull (I still need to varnish and finish it someday and was worried about leaving a residue on the hull). I also wasn’t so sure if a release agent might leave a residue on the inside of the new composite hull which would need to have additional layers added on the inside (echoes of the “don’t do it” advice haunted me).
I also considered the shape of the hull of the Freedom 17. The stems don’t have any “recurve” but the hull does have a bit of tumblehome. I had visions of not being able to get the new hull off the mold without cutting a stem open so I shaped a thin piece of metal and applied it to the bow stem of the canoe (just in case I needed to cut it free).
Still looking for an inert release agent, I stumbled on an idea of using plastic heat-shrink material as a barrier. The stuff you stretch across your windows in the fall to keep your house warm through the long cold winter… Duck brand sells the stuff in sheets large enough to cover an entire canoe (two such pieces to a package!). I tacked an extra cedar strip to my forms below the Freedom 17 hull and applied double face tape (provided with the heat shrink material). Laying the material across the hull is fairly forgiving. Just get the big wrinkles out. The heat shrinking will do the rest. The ends are a bit cumbersome but once it is heat-shrank (shrunk?) it produces a glass-like finish no epoxy in the world would stick to!
Confident that my wood hull was safe, I wet-out the 5 oz Kevlar layer on the hull. It’s harder to see if it fully saturated than fiberglass but once you work with it a bit, you get the hang of it.

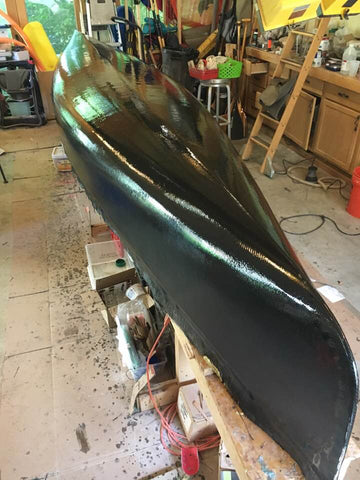
Once no longer tacky but still conducive to a chemical bond, I added a fill layer and waited a couple days (the day job) and sanded lightly, then added a layer of 6 oz Carbon Fiber and a couple fill coats of epoxy.
Finally, after day or two, I sanded lightly and added a layer of 4 oz S-Glass and filled the weave with an extra two coats of epoxy.
After a few days of looking at it and wondering if it would come apart, I tried to pull the composite hull free from the mold. I slid my hand under the lay-up to free it from the plastic heat-shrink easily. But I was unable to lift the hull off the mold. It just seemed too tight (maybe it was the tumblehome) so I took a Dremel tool and split the bow open from the sheerline up about a foot. Then I was able to separate the sides and lift the hull up over the mold revealing the perfectly fine wood strip construction below! Sealing the end back up with a couple layers of Kevlar on the inside was easy.

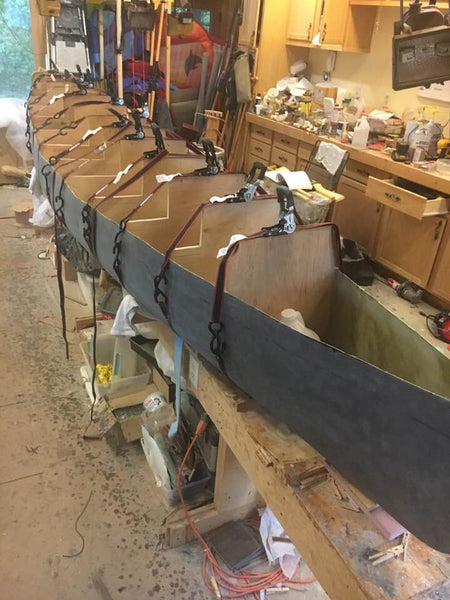
The resultant hull was pretty floppy in its current state with no significant support to keep its shape. I put some straps around it and hung it from the ceiling of my shop with sticks the right length across the beam in a few places on the hull to keep its shape.
The heat shrink material on the wooden hull was in OK condition but needed a bit of touch-up on the bow stem. A couple pieces of packing tape closed it up and readied it for another round of lay-up for the 2nd hull.
The 2nd hull (Jeckle) was constructed using the exact same process materials and order. As I did that lay-up I convinced myself that the hull really ought to have been able to be pulled off the mold without cutting the stem open… Once the lay-up was finished, I worked a bit harder to get it off than I did the first time and was able to remove it fully intact without any cutting.
So then I had the three-layer lay-up of two identical composite canoes ready to finish.
I swapped the two hulls and started working on the inside of the first canoe (Heckle) that I took down from the ceiling of my shop. Jeckle was moved to the ceiling to wait its turn while I worked on Heckle.
As I finished these hulls, I kept measurements of the weight of the build so I could account for the various components of the builds. Tables later in this blog show my accounting for each component. But to this point I hadn’t measured too carefully.
On the inside of Heckle, I added a layer of 3/8” Divincell 4lb/cf foam in the football area with its edge beveled. Attached to the football foam section I connected several (10 per side) heat bent ribs to add strength to the hull. I “borrowed” my wife’s toaster oven from the kitchen to heat each rib using the wood hull itself to shape the ribs. I heated the football section with a heat gun to get it to conform to the bottom of the wood hull. Overall, this totaled to a cubic foot of the 4 lb/cf foam (so four pounds). I then glued all of this into the bottom of the composite hull producing a hull that kept its shape fairly well. I used weights and the original forms to hold the ribs in place while the epoxy set.
On top of all that I added a final layer of 5 oz Kevlar on the inside. This step proved more difficult than expected. Getting the Kevlar to conform to the shape of the ribs distorted the weave so much that I ended up doing the job in 3 pieces (1 over the football area extending an couple inches over the ribs and a piece on each side covering the ribs). A bit ragged by the time I finished. Now the hull was completely rigid and only trim work was left.

Not really focused on weight (like I should have been), I was starting to get anxious to finish the project so I opted to use off-the-shelf gunwales (black anodized aluminum), Seats (ash with webbing) and yoke (ash with conventional pads). I added hefty flotation chambers with pressure equalization plugs. I added a thwart and hand grips on bow and stern built from 1” black anodized aluminum tubing. Decks – I used off-the-shelf replacement decks from a Wenonah canoe. I added some hefty skid-plates using Kevlar felt blackened with graphite stirred into the epoxy to match the color of the hull.
Now all I needed was a few coats of finish. I didn’t think varnish would be my best choice but I needed something to protect my creation from UV. I did some searching and found a product called Max Seal from “The Epoxy Experts”. It dries fast and multiple coats can be put on in a day.
I dropped it on the scale and my jaw dropped – 58 pounds! I was stunned. The very first cedar strip canoe my son Patrick and I built without worrying about weight was 58 pounds….what happened to “light as a feather”??
Then it dawned on me… I have another one of these monsters hanging in the shop that needs to be finished and nearly half of its weight is already there! I really needed to focus more on shedding weight in the second incarnation of this adventure!
Here’s the weight of the elements of Heckle as best as I can reconstruct it:
|
Heckle |
|
|
Weight (pounds) |
Components |
|
24 |
hull |
|
16 |
Inside layers |
|
4 |
1 cu ft 4 lb foam |
|
12 |
5 oz Kevlar / epoxy |
|
18.2 |
trim |
|
7 |
Gunwales |
|
0.52 |
Seat mount brackets |
|
1 |
Thwart / hand holds |
|
Flotation Chambers |
|
|
5.4 |
seats (incl bolts) |
|
3.3 |
Yoke (incl brackets/HW) |
|
1 |
Skid plates |
|
Total Weight: |
58.2 lbs |
It’s clear that vacuum bagging might have saved me a bunch of weight (I seemed to use an enormous amount of epoxy wetting out layers of the hull). I might have gotten away without doing fill coats between layers and used a bit less epoxy there as well. Gunwales, seats and yoke represented big opportunities. But so did the core and inside layer of cloth (and epoxy).
I had my work cut out for me.
New instalments in Randy's series will be published weekly - check back soon for Part II!